- Published on
Getting Started with Supabase: A Hands-On Guide for Beginners
- Authors

- Name
- Nguyen Phuc Cuong
Getting Started with Supabase: A Hands-On Guide
Hey there! Ever found yourself needing a backend but dreading the setup time? Or maybe you're a Firebase fan who wants PostgreSQL superpowers? Well, let me introduce you to Supabase – an open-source Firebase alternative that might just make your developer life a whole lot easier.
In this guide, we'll cover what Supabase is and then jump straight into building something cool with it. No long theoretical sections – just the essentials and then straight to the code!
What is Supabase?
Supabase is like your backend bestie. It's an open-source Firebase alternative that gives you:
- PostgreSQL Database: A full-featured, scalable database (not a NoSQL one like Firebase)
- Authentication: Email/password, social logins, magic links – the works!
- Auto-generated APIs: REST and real-time subscriptions without writing a single line of backend code
- Storage: For all your files and media
- Edge Functions: For when you need custom server-side logic
The best part? Unlike Firebase, it's built on PostgreSQL, so you get all the power of a proper relational database with SQL queries, joins, and transactions. And since it's open source, you can even self-host if you want complete control.
Let's Build Something!
Instead of just talking about Supabase, let's actually use it to build a simple note-taking app. This will give you a feel for how it works in real life.
What We'll Build
A mini note-taking app with:
- User authentication
- Creating and viewing notes
- Uploading images to notes
Step 1: Setting Up Supabase
First, let's create a Supabase project:
- Head over to supabase.com and sign up if you haven't already
- Click "New Project"
- Give your project a name (like "QuickNotes")
- Set a secure database password (save this somewhere safe!)
- Choose the region closest to you
- Click "Create new project"
Supabase will take about 2 minutes to get your project ready. While we wait, let's set up our frontend!
Step 2: Setting Up Our Frontend
Let's use a simple React app for our frontend. In your terminal:
# Create a new project
npx create-react-app supabase-notes
cd supabase-notes

# Install Supabase client library
npm install @supabase/supabase-js
Now create a file called .env in your project root and add your Supabase URL and key (you can find these in your Supabase project settings under API):
REACT_APP_SUPABASE_URL=https://your-project-url.supabase.co
REACT_APP_SUPABASE_ANON_KEY=your-anon-key
Step 3: Setting Up the Database
While our app is preparing, let's set up our database schema. In the Supabase dashboard:
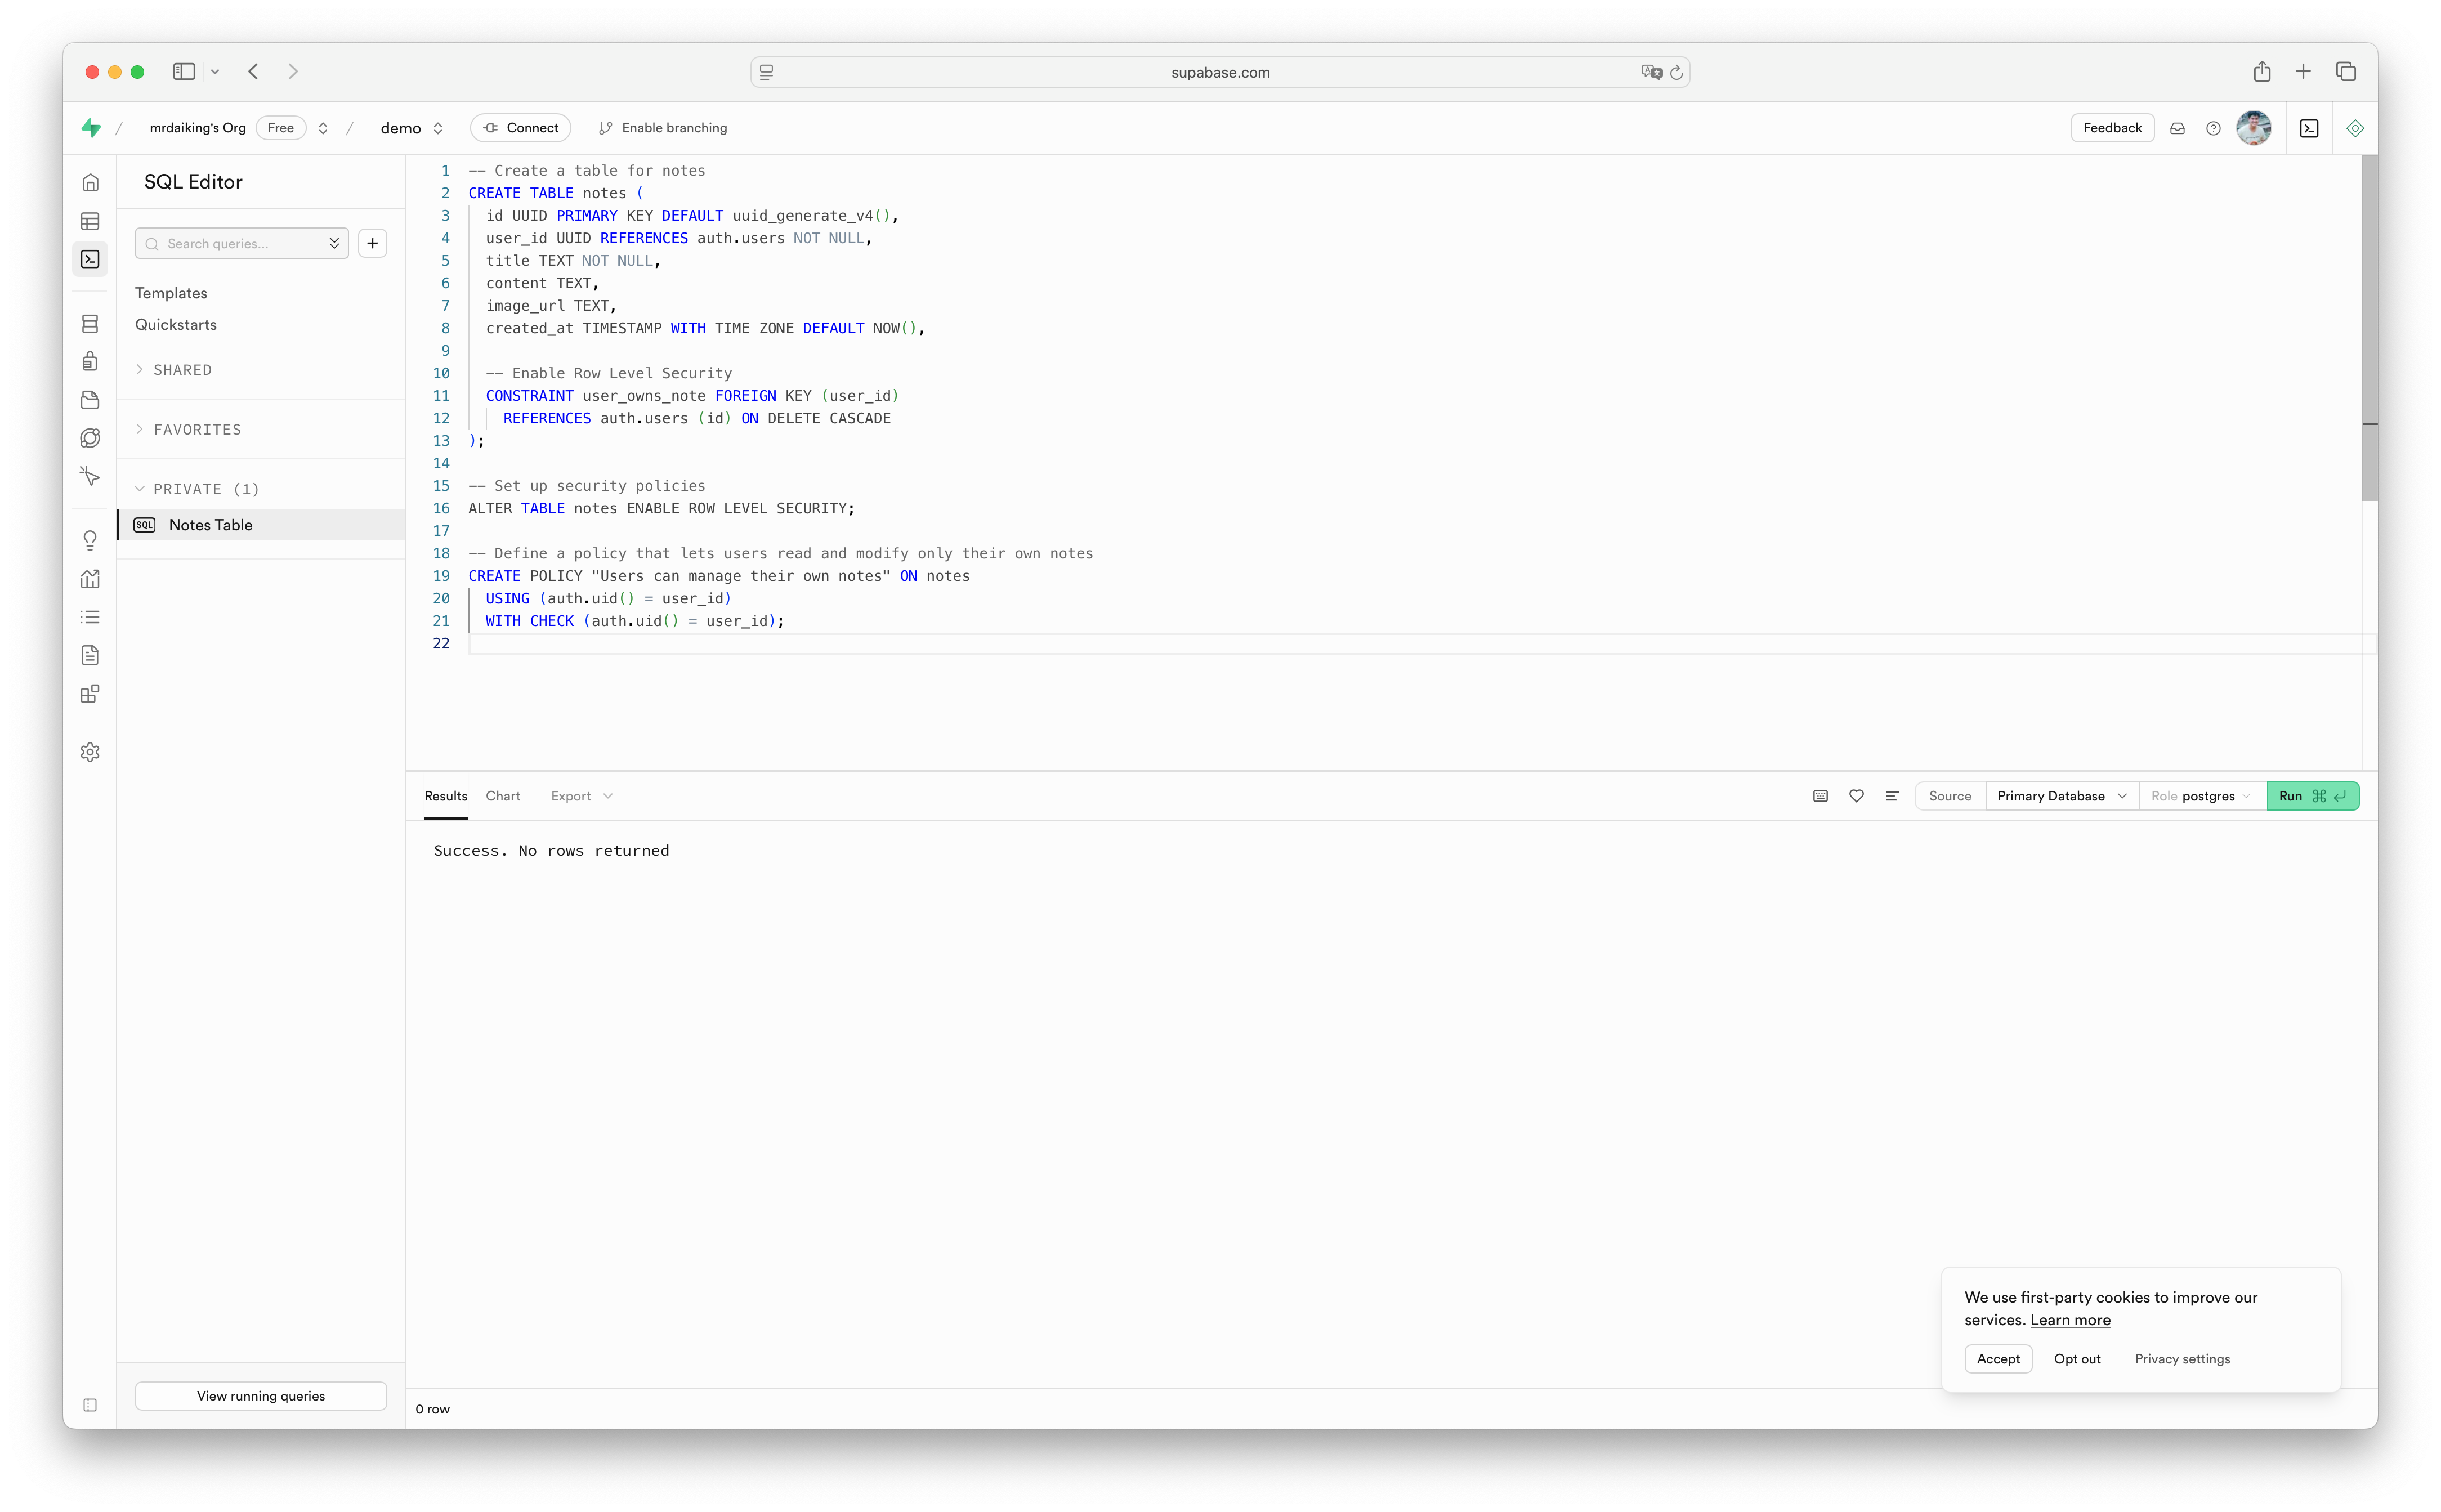
- Go to the "SQL Editor" section
- Click "New Query"
- Enter the following SQL:
-- Create a table for notes
CREATE TABLE notes (
  id UUID PRIMARY KEY DEFAULT uuid_generate_v4(),
  user_id UUID REFERENCES auth.users NOT NULL,
  title TEXT NOT NULL,
  content TEXT,
  image_url TEXT,
  created_at TIMESTAMP WITH TIME ZONE DEFAULT NOW(),

  -- Enable Row Level Security
  CONSTRAINT user_owns_note FOREIGN KEY (user_id)
    REFERENCES auth.users (id) ON DELETE CASCADE
);

-- Set up security policies
ALTER TABLE notes ENABLE ROW LEVEL SECURITY;

-- Define a policy that lets users read and modify only their own notes
CREATE POLICY "Users can manage their own notes" ON notes
  USING (auth.uid() = user_id)
  WITH CHECK (auth.uid() = user_id);
Click "Run" to create our notes table with all the proper security settings.
Step 4: Setting Up Authentication
Let's create a simple authentication component in our React app. Create a new file src/Auth.js:
import { useState } from 'react';
import { supabase } from './supabaseClient';
export default function Auth() {
const [loading, setLoading] = useState(false);
const [email, setEmail] = useState('');
const [password, setPassword] = useState('');
const handleSignUp = async (e) => {
e.preventDefault();
try {
setLoading(true);
const { error } = await supabase.auth.signUp({
email,
password,
options: {
emailRedirectTo: window.location.origin
}
});
if (error) throw error;
alert("Check your email for the confirmation link!");
} catch (error) {
alert(error.message);
} finally {
setLoading(false);
}
};
const handleSignIn = async (e) => {
e.preventDefault();
try {
setLoading(true);
const { error } = await supabase.auth.signInWithPassword({ email, password });
if (error) throw error;
} catch (error) {
alert(error.message);
} finally {
setLoading(false);
}
};
return (
<div className="auth-container">
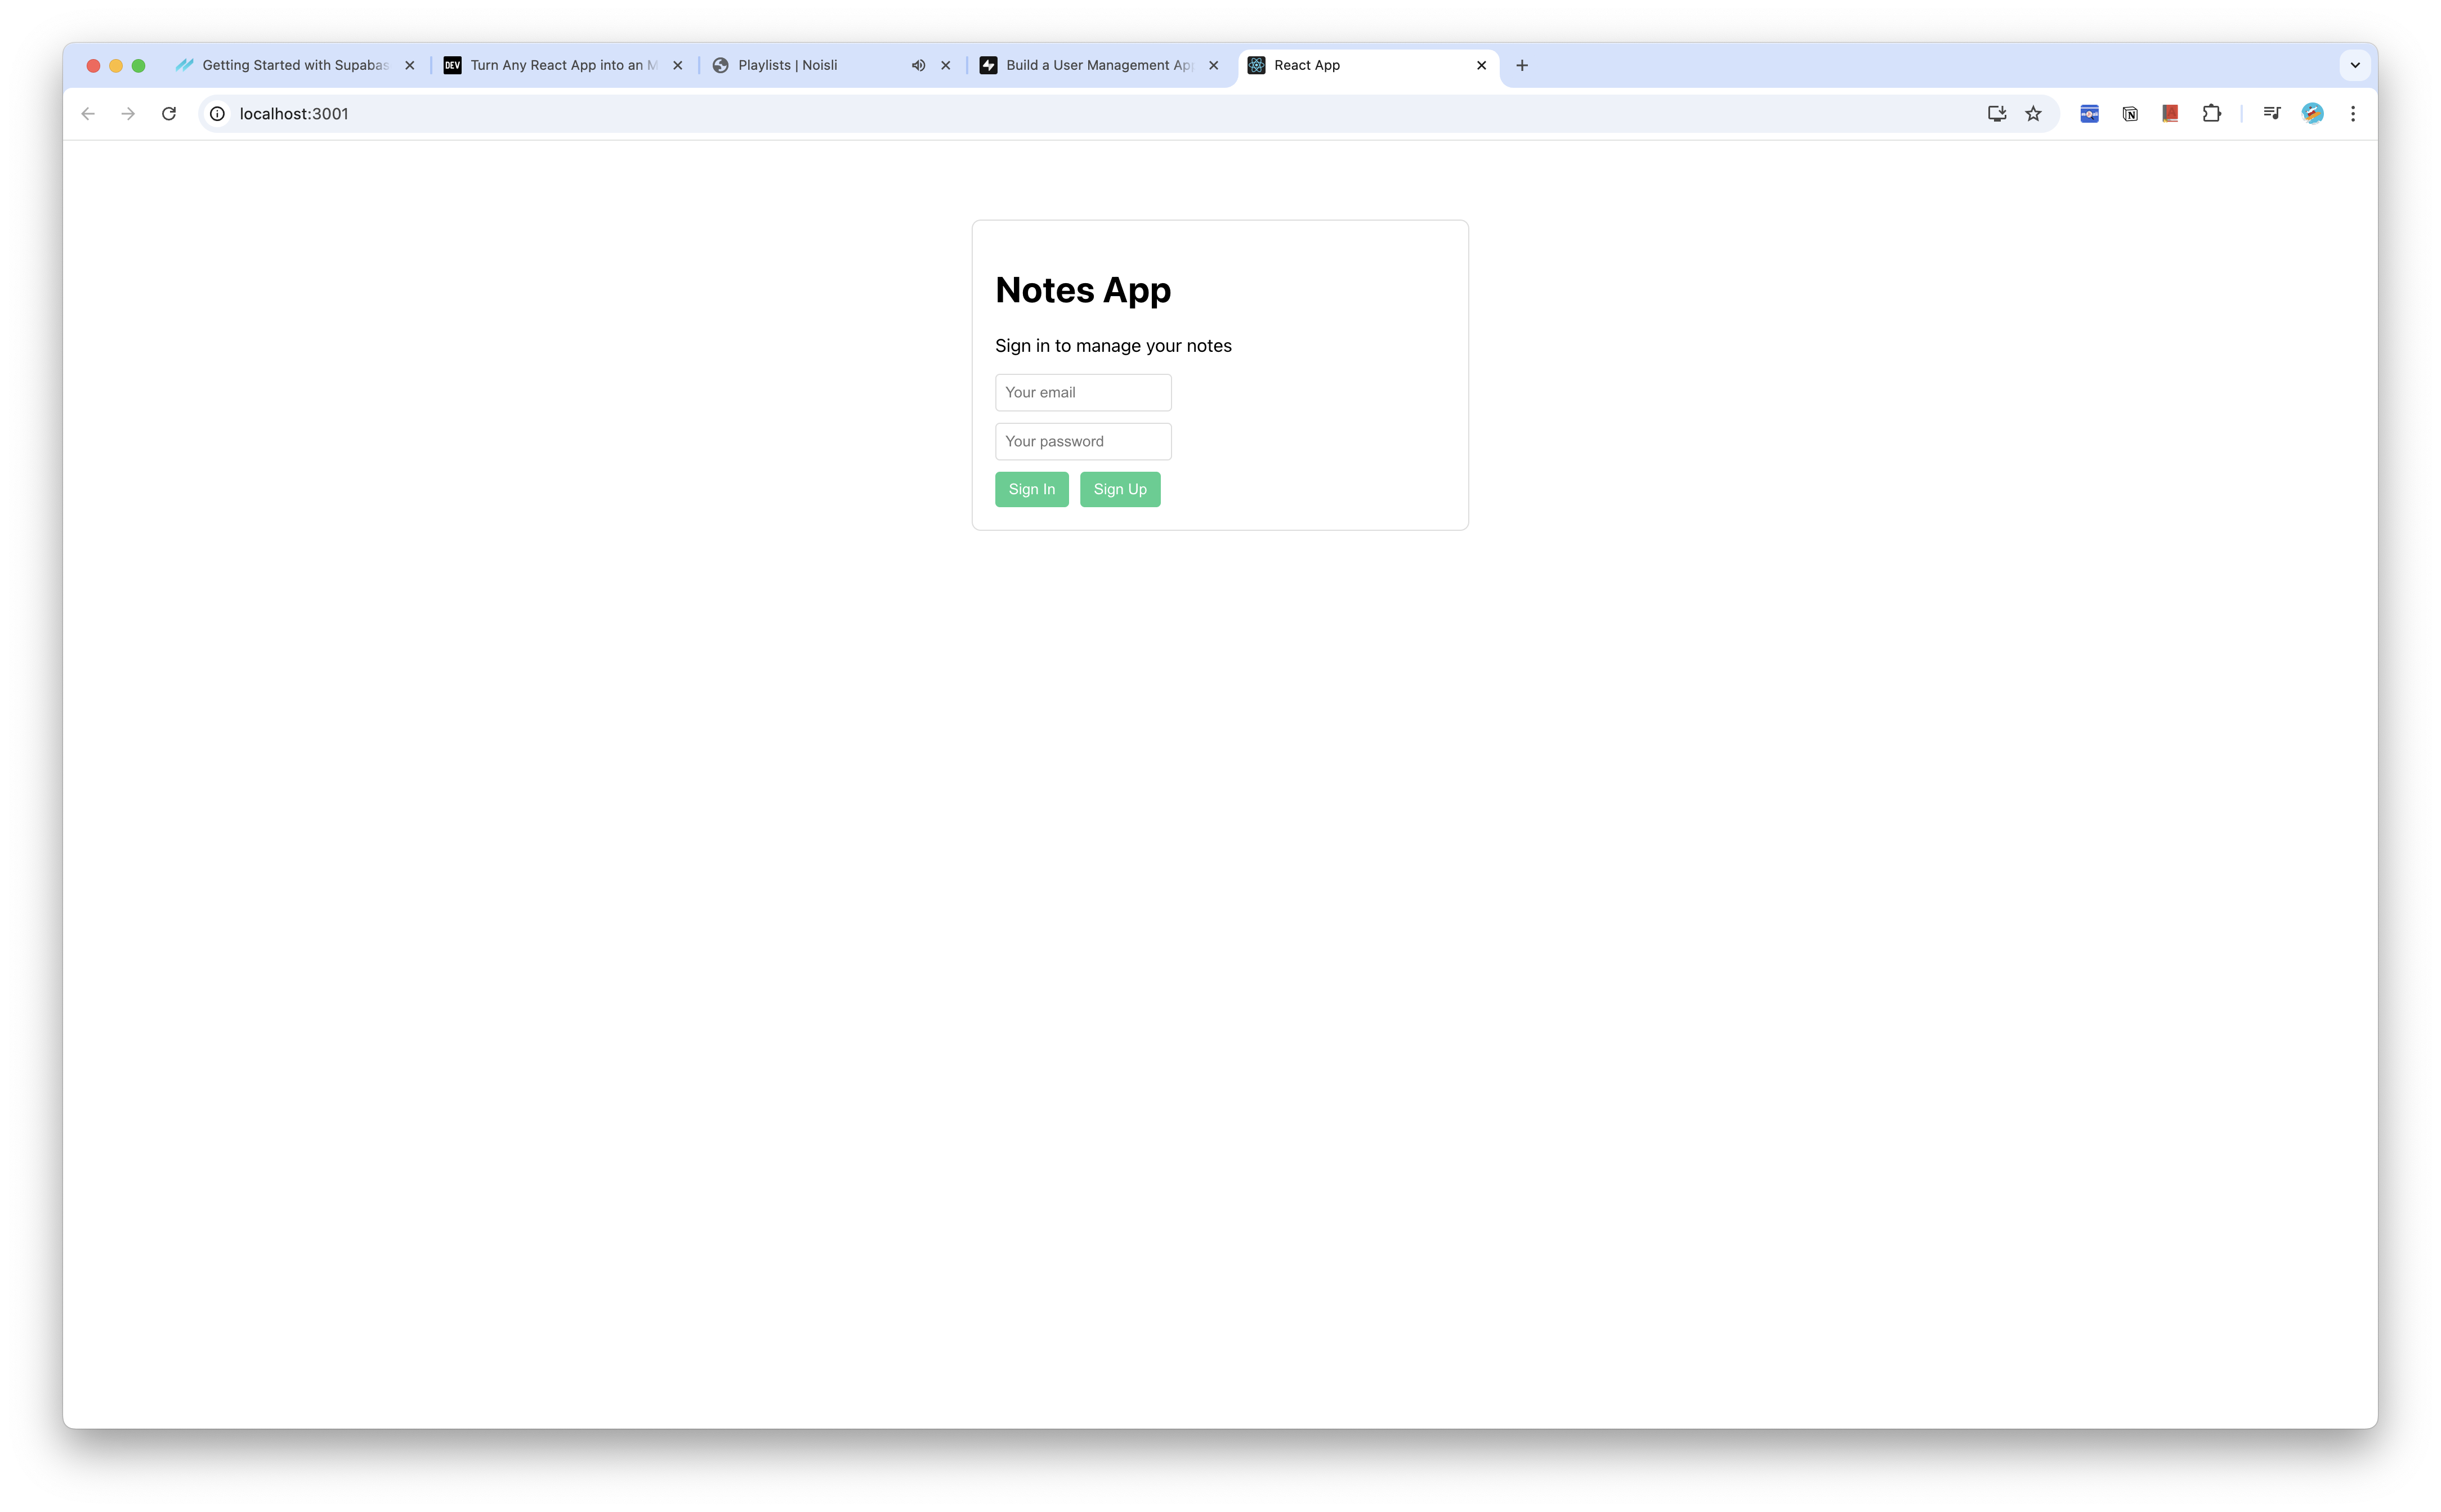
<h1>Notes App</h1>
<p>Sign in to manage your notes</p>
<form>
<div>
<input
type="email"
placeholder="Your email"
value={email}
onChange={(e) => setEmail(e.target.value)}
required
/>
</div>
<div>
<input
type="password"
placeholder="Your password"
value={password}
onChange={(e) => setPassword(e.target.value)}
required
/>
</div>
<div className="button-group">
<button
onClick={handleSignIn}
disabled={loading}
>
{loading ? 'Loading...' : 'Sign In'}
</button>
<button
onClick={handleSignUp}
disabled={loading}
>
Sign Up
</button>
</div>
</form>
</div>
);
}
Now create a client connection to Supabase. Create src/supabaseClient.js:
import { createClient } from '@supabase/supabase-js';

const supabaseUrl = process.env.REACT_APP_SUPABASE_URL;
const supabaseAnonKey = process.env.REACT_APP_SUPABASE_ANON_KEY;

export const supabase = createClient(supabaseUrl, supabaseAnonKey);
Step 5: Creating the Notes Component
Let's make a Notes component to display and create notes. Create a new file src/Notes.js:
import { useState, useEffect } from 'react';
import { supabase } from './supabaseClient';

export default function Notes({ user }) {
  const [notes, setNotes] = useState([]);
  const [title, setTitle] = useState('');
  const [content, setContent] = useState('');
  const [loading, setLoading] = useState(true);
  const [imageFile, setImageFile] = useState(null);
  const [uploading, setUploading] = useState(false);

  useEffect(() => {
    getNotes();
  }, []);

  const getNotes = async () => {
    try {
      setLoading(true);

      const { data, error } = await supabase
        .from('notes')
        .select('*')
        .order('created_at', { ascending: false });

      if (error) throw error;

      setNotes(data);
    } catch (error) {
      alert('Error fetching notes: ' + error.message);
    } finally {
      setLoading(false);
    }
  };

  const createNote = async (e) => {
    e.preventDefault();

    if (!title) return;

    try {
      let imageUrl = null;

      // If an image is selected, upload it first
      if (imageFile) {
        setUploading(true);
        const fileExt = imageFile.name.split('.').pop();
        const fileName = `${Math.random()}.${fileExt}`;
        const filePath = `${user.id}/${fileName}`;

        const { error: uploadError } = await supabase.storage
          .from('note-images')
          .upload(filePath, imageFile);

        if (uploadError) throw uploadError;

        imageUrl = `${process.env.REACT_APP_SUPABASE_URL}/storage/v1/object/public/note-images/${filePath}`;
        setUploading(false);
      }

      // Create the note with or without image
      const { error } = await supabase
        .from('notes')
        .insert([
          {
            title,
            content,
            user_id: user.id,
            image_url: imageUrl
          }
        ]);

      if (error) throw error;

      // Reset form
      setTitle('');
      setContent('');
      setImageFile(null);

      // Refresh notes list
      getNotes();

    } catch (error) {
      alert('Error creating note: ' + error.message);
    }
  };

  return (
    <div className="notes-container">
      <h1>Your Notes</h1>

      {/* Create note form */}
      <form onSubmit={createNote} className="note-form">
        <input
          type="text"
          placeholder="Title"
          value={title}
          onChange={(e) => setTitle(e.target.value)}
          required
        />

        <textarea
          placeholder="Note content"
          value={content}
          onChange={(e) => setContent(e.target.value)}
          rows={4}
        ></textarea>

        <input
          type="file"
          accept="image/*"
          onChange={(e) => setImageFile(e.target.files[0])}
        />

        <button type="submit" disabled={uploading}>
          {uploading ? 'Uploading...' : 'Save Note'}
        </button>
      </form>

      {/* Display notes */}
      <div className="notes-list">
        {loading ? (
          <p>Loading notes...</p>
        ) : notes.length === 0 ? (
          <p>No notes yet. Create one!</p>
        ) : (
          notes.map((note) => (
            <div key={note.id} className="note-card">
              <h3>{note.title}</h3>
              <p>{note.content}</p>
              {note.image_url && (
                <img
                  src={note.image_url}
                  alt="Note attachment"
                  className="note-image"
                />
              )}
              <small>
                Created: {new Date(note.created_at).toLocaleDateString()}
              </small>
            </div>
          ))
        )}
      </div>
    </div>
  );
}
Step 6: Setting Up Storage
Before we can upload images, we need to configure storage in Supabase:
- Go to the "Storage" section in your Supabase dashboard
- Click "Create bucket"
- Name it "note-images"
- Make sure "Public bucket" is checked
- Click "Create bucket"
Next, we need to add a storage policy so users can upload files:
- Click on the "note-images" bucket
- Go to the "Policies" tab
- Click "Add policies" and then "Create custom policy"
- Enter the following policy name: "Users can upload their own images"
- Enter this SQL for the definition:
(bucket_id = 'note-images' AND auth.role() = 'authenticated' AND (storage.foldername(name))[1] = auth.uid()::text)
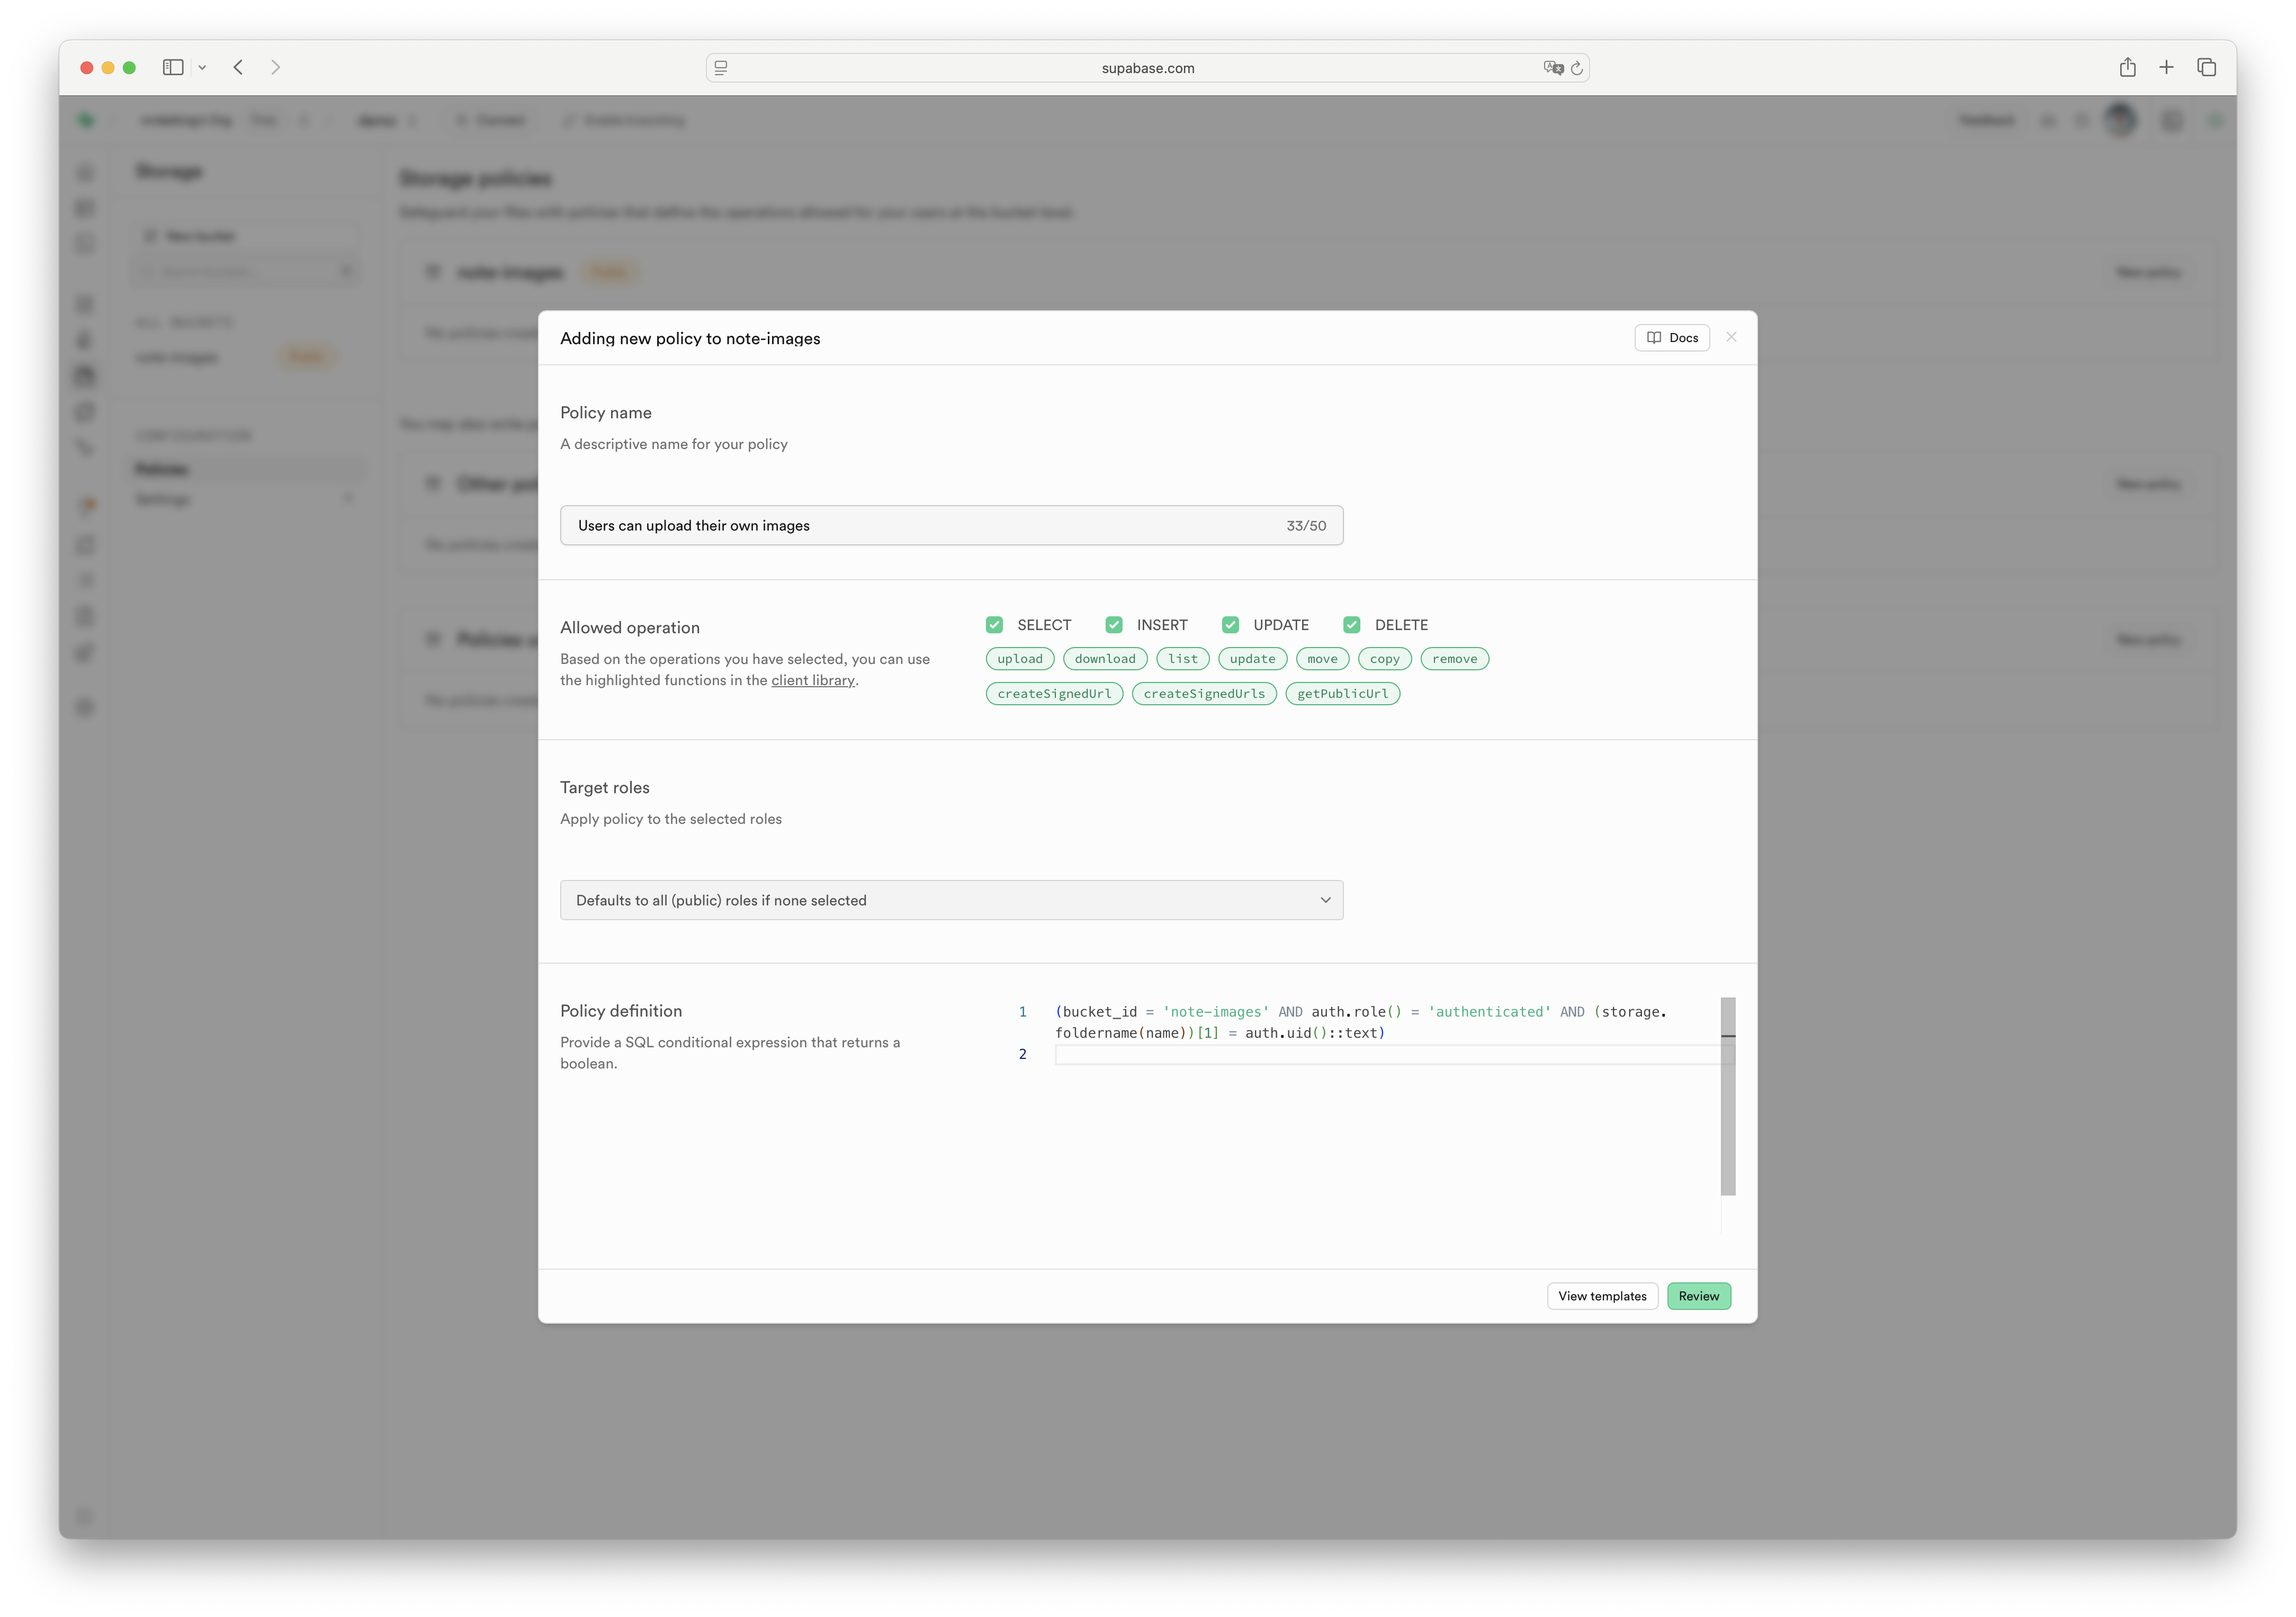
This policy lets authenticated users upload files only to folders matching their user ID.
Step 7: Bringing It All Together
Finally, let's update src/App.js to tie everything together:
import { useState, useEffect } from 'react';
import { supabase } from './supabaseClient';
import Auth from './Auth';
import Notes from './Notes';
import './App.css';

function App() {
  const [session, setSession] = useState(null);

  useEffect(() => {
    // Get current session
    supabase.auth.getSession().then(({ data: { session } }) => {
      setSession(session);
    });

    // Listen for auth changes
    const {
      data: { subscription },
    } = supabase.auth.onAuthStateChange((_event, session) => {
      setSession(session);
    });

    return () => subscription.unsubscribe();
  }, []);

  return (
    <div className="container">
      {!session ? (
        <Auth />
      ) : (
        <div className="logged-in-container">
          <header>
            <h2>Welcome, {session.user.email}</h2>
            <button onClick={() => supabase.auth.signOut()}>Sign Out</button>
          </header>

          <Notes user={session.user} />
        </div>
      )}
    </div>
  );
}

export default App;
And add some basic styling in src/App.css:
.container {
  max-width: 800px;
  margin: 0 auto;
  padding: 20px;
}

.note-form {
  display: flex;
  flex-direction: column;
  margin-bottom: 20px;
}

.note-form input,
.note-form textarea,
.auth-container input {
  margin-bottom: 10px;
  padding: 8px;
  border: 1px solid #ddd;
  border-radius: 4px;
}

.note-card {
  border: 1px solid #ddd;
  border-radius: 4px;
  padding: 15px;
  margin-bottom: 15px;
}

.note-image {
  max-width: 100%;
  max-height: 200px;
  margin-top: 10px;
}

header {
  display: flex;
  justify-content: space-between;
  align-items: center;
  margin-bottom: 20px;
}

button {
  background-color: #3ECF8E;
  color: white;
  border: none;
  padding: 8px 12px;
  border-radius: 4px;
  cursor: pointer;
}

button:hover {
  background-color: #36b97f;
}

.auth-container {
  max-width: 400px;
  margin: 50px auto;
  padding: 20px;
  border: 1px solid #ddd;
  border-radius: 8px;
}

.button-group {
  display: flex;
  gap: 10px;
}
Step 8: Run Your App!
Now let's start our app:
npm start
Authentication screen:
Upload image screen:

Finish screen:
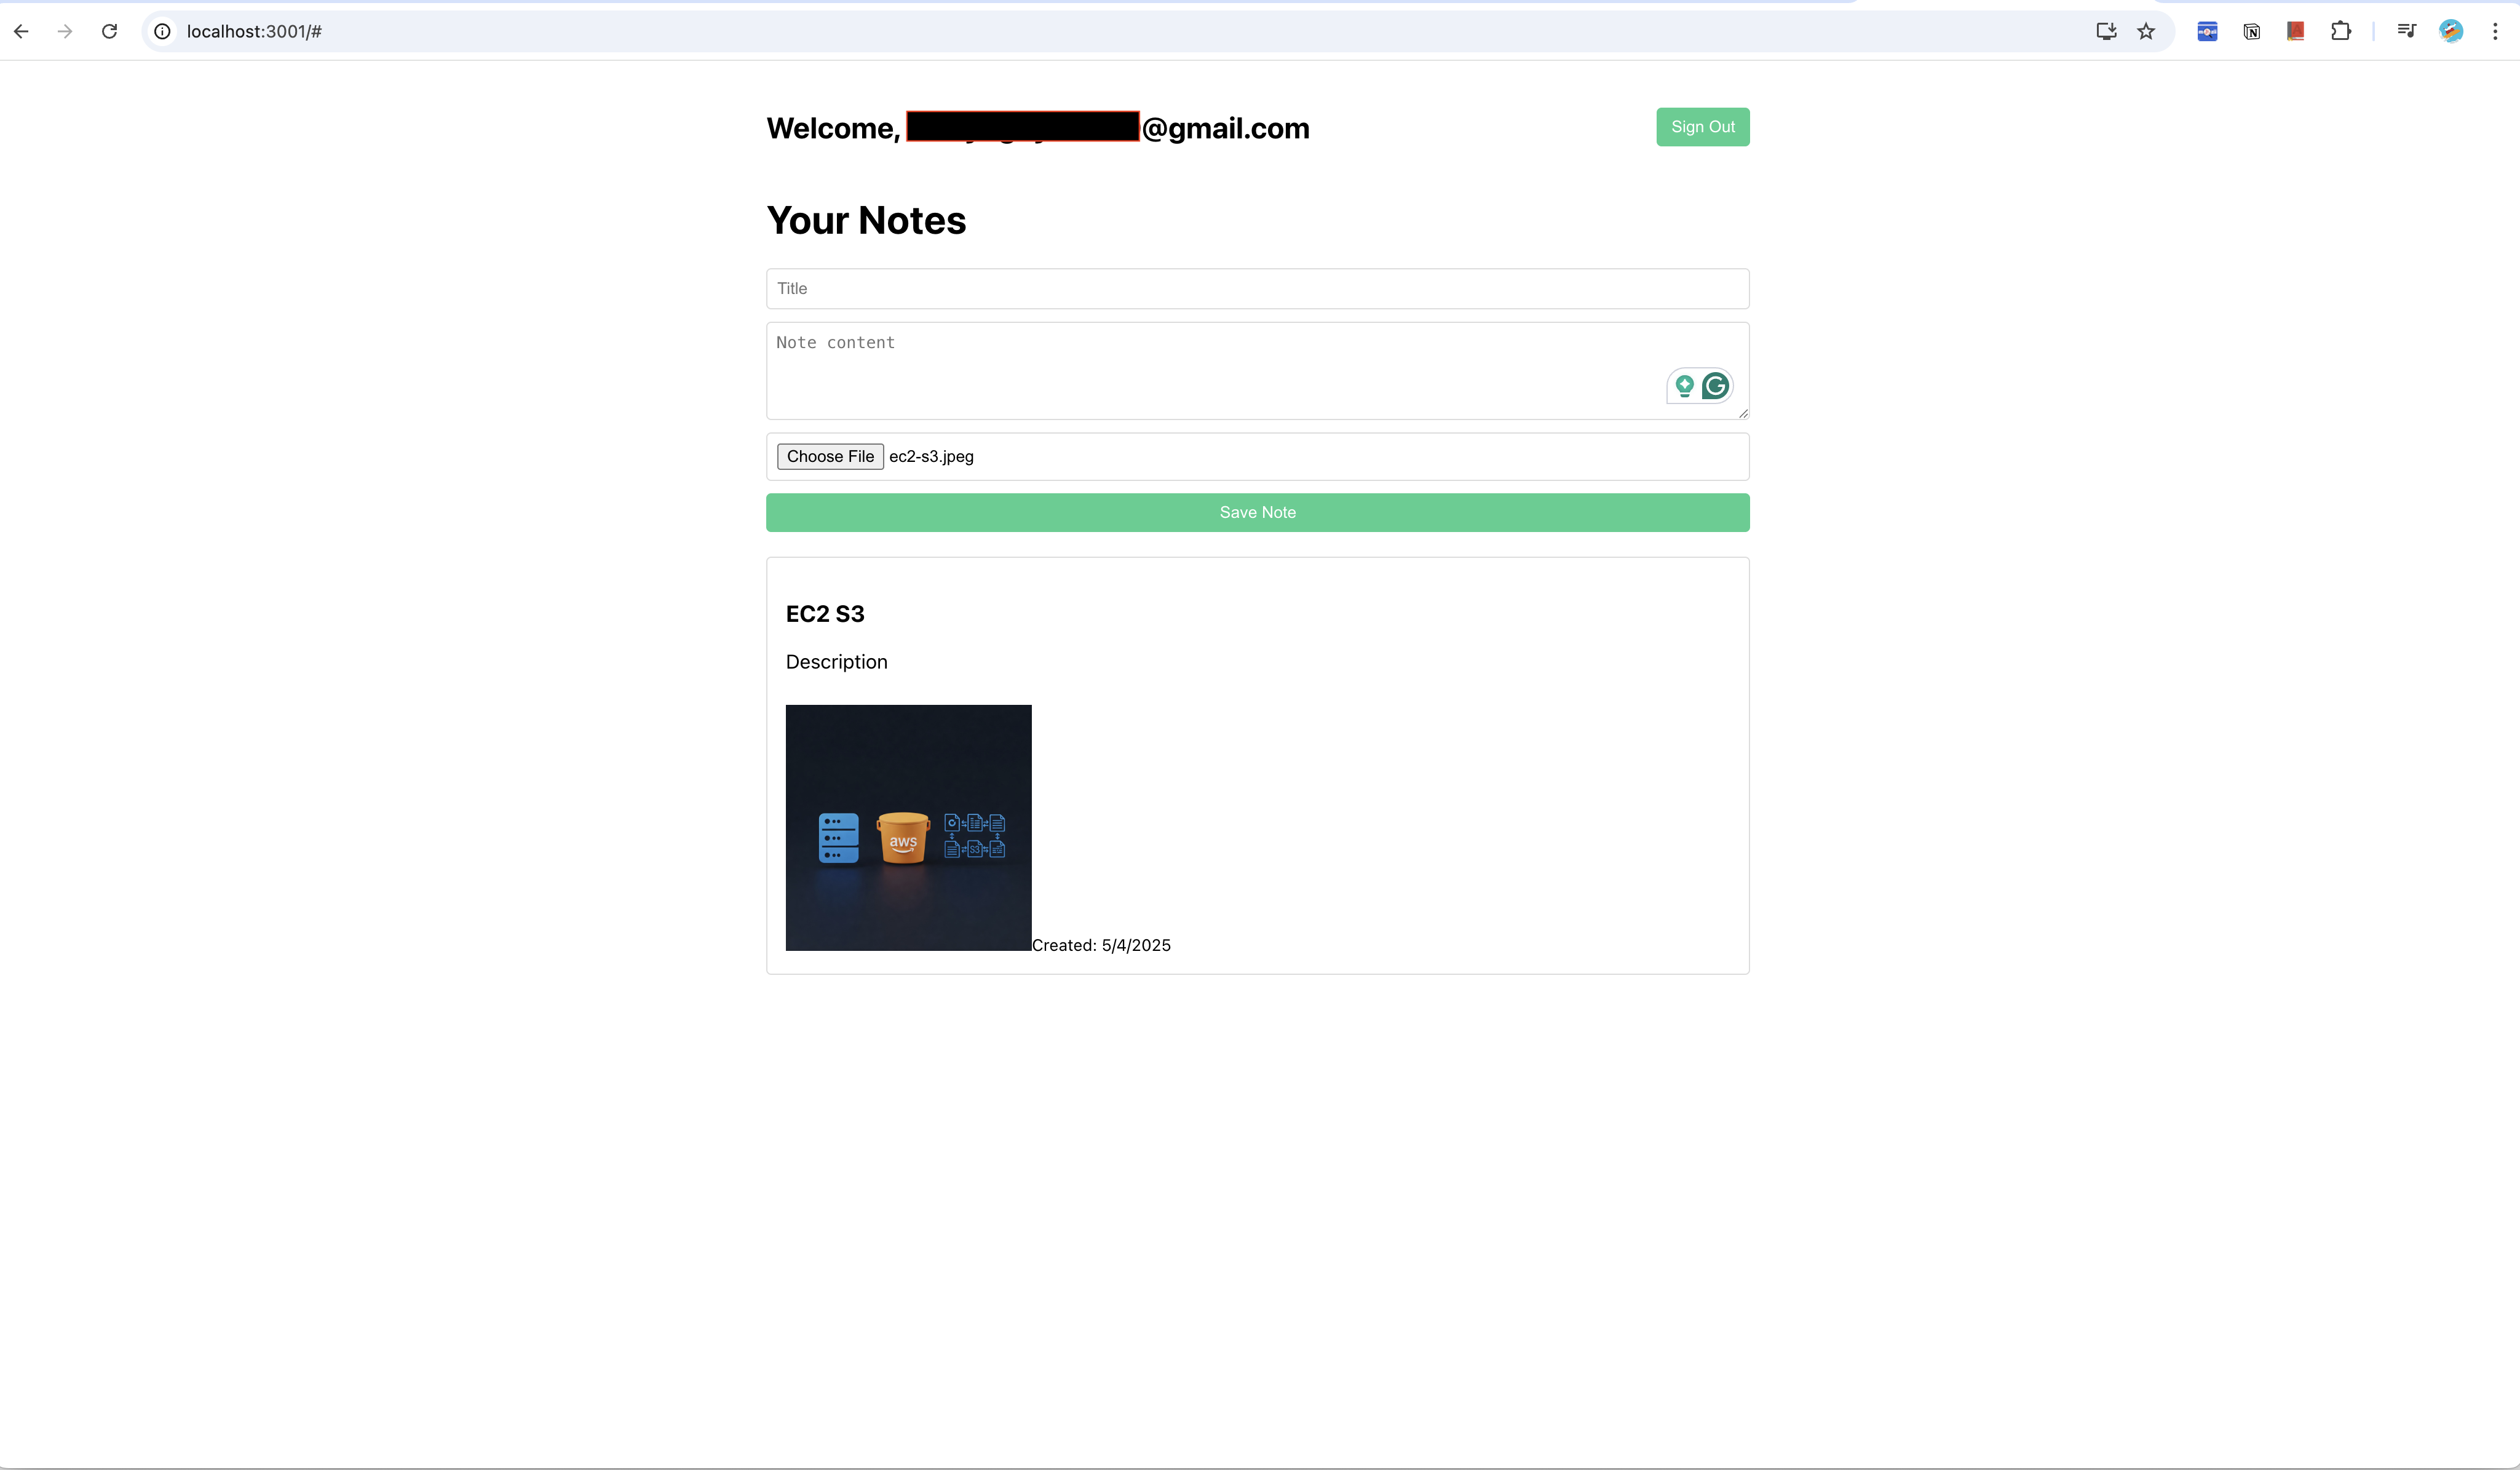
You now have a fully functional note-taking app with:
- User authentication (sign up, sign in, sign out)
- Creating and viewing notes
- Image uploads for notes
- Real-time updates (try opening the app in two different browsers!)
What We Learned
In less than an hour, we've:
- Set up a Supabase project
- Created a PostgreSQL database with proper security
- Implemented authentication
- Used Supabase's storage for file uploads
- Built a real-time application without writing a single line of backend code
Taking It Further
Now that you've got the basics, here are some cool things you might want to try:
- Add Social Login: Supabase supports GitHub, Google, and more authentication providers
- Implement Row-Level Security: We've already set it up, but explore more complex policies
- Add Real-Time Subscriptions: Update this line in the Notes component:
// Add this inside useEffect()
const subscription = supabase
  .channel('public:notes')
  .on('postgres_changes', { event: '*', schema: 'public', table: 'notes' }, payload => {
    if (payload.new.user_id === user.id) {
      getNotes();
    }
  })
  .subscribe();

return () => {
  subscription.unsubscribe();
};
Conclusion
Supabase gives you all the tools you need to build full-stack applications without managing a backend. It's perfect for side projects, MVPs, or even production apps where you want to move fast without sacrificing quality or scalability.
The best part about Supabase is that it's built on PostgreSQL, so you're not locked into a proprietary system. You own your data, and you can even export it or self-host if you need to.
So next time you're starting a project and thinking about the backend, give Supabase a try. Your future self might thank you for the hours of backend work you didn't have to do!
Happy coding! 🚀